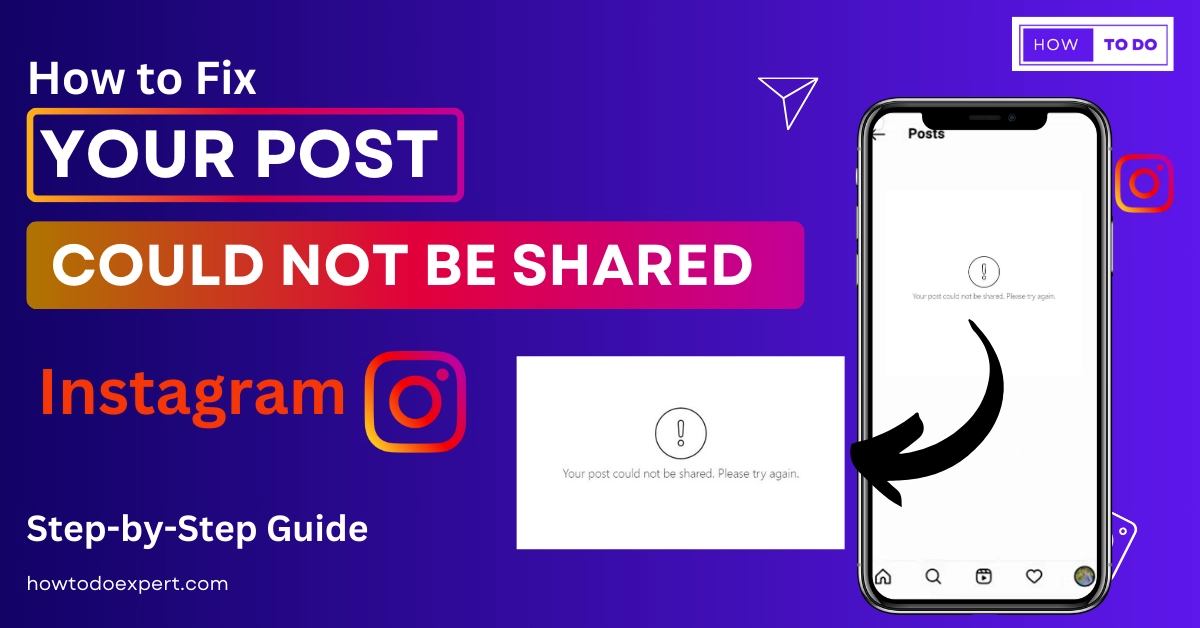
Instagram Your Post Could Not Be Shared – Fixed
Are you worried about the “your post could not be shared, please try again” error on Instagram? Many Instagram users have faced this issue at some point. It can be especially irritating when you’re eager to share a special moment or important update with your followers. Don’t worry about this. I have brought solutions for you.
There are steps you can take to overcome this issue, and get back to sharing accordingly. From checking your internet connection to ensuring your content complies with Instagram’s guidelines, troubleshooting this error is manageable. Patience, persistence, and a dash of technical know-how are key. So, let’s find the solutions and make those sharing obstacles a thing of the past.
Your Post Could Not Be Shared Instagram – Error Mean?
The error message “your post could not be shared on Instagram” may initially seem to relate to issues with post sharing. However, its actual meaning is more refined than it appears.
This error alerts you that you need help publishing your content.
This error notice appears when Instagram users try to submit a picture or a video, which slows down the uploading process. Instagram users attempting to share their material with their followers and the Instagram community may need more support from this inconvenience.
Why Instagram Post Could Not Be Shared
Instagram may display an error message stating that your post could not be shared due to several possible reasons, each of which we will delve into further:
1. Image Dimensions
Instagram operates within specific image dimension parameters ranging from 330 to 1080 pixels. If you attempt to upload an image outside of this range, Instagram may prohibit the post from being shared. Therefore, ensuring that your post adheres to these standard dimensions is imperative to avoid this issue.
2. Uploading Multiple Posts Simultaneously
Instagram prefers users upload posts one at a time rather than in bulk. Attempting to upload numerous posts simultaneously can raise red flags and potentially lead to restrictions on your posting capabilities. Therefore, it is advisable to share your content sequentially to prevent this obstacle.
3. Usage of Third-Party Software
Utilizing third-party software applications to interact with Instagram can be a common practice among users. It’s important to remember that Instagram does not encourage or endorse the use of such third-party applications.
If Instagram detects your use of these tools, it may impose limitations on your account, affecting your ability to perform various actions on the platform. Refraining from relying on third-party software to maintain a smooth Instagram experience is advisable.
4. File Format Compatibility
Instagram supports a limited range of file formats, primarily .jpg and .wav. Incompatibility with these supported formats can lead to a failed post-sharing attempt. Notably, Instagram does not support the PNG format.
If you attempt to upload a PNG file, Instagram will try to convert it to .jpg format. Your post will be shared if the conversion is successful; if not, the sharing operation will be unsuccessful.
Ensure your file format aligns with Instagram’s supported formats to avoid this issue.
5. Bugs
Instagram often experiences technical issues and glitches that can disrupt your user experience. Many errors, such as the frustrating “sorry, your post could not be shared” message, can be attributed to these bugs.
6. Server Down
Given Instagram’s massive user base of over two billion people, it’s no surprise that the platform occasionally faces server downtime and outages. Maintaining a server infrastructure of this scale is a complex task.
During maintenance of unexpected issues, Instagram’s servers can go offline. When the server is down, it impacts the smooth functioning of the app, including the ability to share posts.
7. Unstable Network
If your internet connection is weak, it can be a primary reason behind Instagram errors. Instagram relies entirely on a stable internet connection for its proper operation. When your internet connection is weak, the app may struggle to function correctly, resulting in error messages and hindering certain tasks.
8. Outdated Version and Cache
Another reason Instagram might prevent you from sharing your post is the use of an outdated app version. It’s essential to keep your Instagram app up to date to avoid compatibility issues and errors.
Additionally, the app accumulates cache data over time to enhance performance. However, an excessive buildup of cached data can lead to issues, including the inability to share your posts. Regularly clearing your app’s cache can help resolve this problem.
9. Against Guidelines
Instagram has established strict community guidelines prohibiting sharing content, including nudity, sexual content, or content that violates their policies. Attempting to post content that goes against these guidelines will result in Instagram preventing you from doing so.
You can manage Instagram’s criteria more skillfully and improve your chances of successfully sharing your content without running into sharing problems by being aware of and taking care of these things.
Instagram Your Post Could Not Be Shared- Working Fix
While using Instagram, I encountered the “Your Post Could Not Be Shared” error. However, I managed to resolve it through two steps. First, I removed the music from a video I was trying to post, and second, I changed my browser on my PC. These actions successfully resolved the problem for me.
If you are facing the same problem, then apply these two steps. Still, the error pursued a series of solutions is given below. I ensure by following these steps, you will overcome the problem.
How to Fix “Your Post Could Not Be Shared” Instagram?
Fixing the “Your Post Could Not Be Shared” error on Instagram requires a few steps to ensure a smooth experience on the platform. Let’s follow each solution while expanding on them:
1. Scale Down the Image
It’s important to ensure your image meets Instagram’s stringent requirements for size. You must try to adjust your image if it occurs to be larger than Instagram’s permitted size restrictions. In addition to lowering the quality of your posts, oversized photographs cause sharing problems that could ruin your entire Instagram experience.
2. Avoid Posting Too Many Pictures/videos
Instagram may simultaneously limit users who share excessive posts to preserve a great user experience. Exercise restraint and limit the number of posts you share at once to avoid getting tagged as spam. By doing this, you adhere to Instagram’s rules and guarantee a smooth experience.
3. Wait for Server Issues
Sometimes, Instagram’s technical issues, rather than something you did, are the real cause of the sharing error. There is frequently little you can do in these situations other than to be patient. Often, the only option is to wait for Instagram’s servers to resume normal service.
4. Updating Your App
Consider updating the Instagram app immediately if you discover that you are still using an old version. Older versions may contain flaws or defects or be missing essential functionality, which could prolong the sharing error.
To guarantee you have the most recent version with all required fixes and improvements, just go to the app store on your smartphone, search for Instagram, and tap “Install.”
5. Try the Instagram Website
Sometimes, the bugs you run into affect the mobile app, not the website. You can view Instagram through your web browser to get around problems with the app. You may avoid potential app-related issues and guarantee a smoother sharing process by logging into your account and attempting to upload your content via the website’s user interface.
6. Avoid third-party Software
Avoid using third-party software or applications for Instagram-related tasks. These applications go against Instagram’s service rules and frequently result in annoying errors, such as “Your Post Could Not be Shared.”
7. Check the File format
Instagram supports a limited range of file formats. Check to see if instagram does not accept your content’s format. If not, change the format of your file before uploading it to Instagram.
8. Turn On Unrestricted Data Usage
The user encounters numerous issues when the data-saving mode is sometimes enabled. So make sure it is on by checking. And if so, switch it off.
The steps are as follows:
- On the home screen, give the Instagram icon a long tap.
- Go to the app’s information page and select “mobile data and wi-fi.”
- Enable “Unrestricted data usage.”
9. Switch Internet Connection
It becomes more stable when the internet connection is changed frequently. For instance, if users normally use mobile data, they should consider using Wi-Fi instead, and vice versa.
However, there are several circumstances where switching is impossible. Then, in that scenario, take the following actions:
- Activate the airplane mode, wait a while, and then deactivate it.
- Airplane mode can also be activated to stabilize the speed.
Following these guidelines and being mindful of Instagram’s policies and limitations can increase the likelihood of successfully sharing your posts on the platform without encountering the “Your Post Could Not Be Shared” error.
10. Remove Cache
An overloaded cache is useless. Keeping it clear is, therefore, preferable. If you haven’t already, do it right away.
The method for clearing Instagram’s cache is described here.
With Android
- Find Instagram in the settings menu and touch it.
- Tap on cache and storage.
- Select “clear cache.”
On IOS devices
- Select Instagram under settings > general.
- Finally, activate the “offload app.”
11. Follow Instagram’s Guidelines
Users are expected to abide by the guidelines. Thus, they are made. The app will penalize you if you violate any of these guidelines. So, abide by all the platform’s instructions.
12. Report
The support staff at Instagram is available to you. They will try to assist you if you tell them about your problem. The steps for reporting are as follows:
- Enter your Instagram account’s settings.
- Click “help.”
- To report a problem, turn it on.
- Click “report a problem.”
- Any way you choose, report it. I advise reporting it without trembling.
- Select a stable report and describe the problem.
Frequently Asked Questions
Q 1- How Do I Make My Instagram Posts Shareable?
To make your Instagram posts shareable, ensure your Instagram account is set to “Public” rather than “Private” in your privacy settings. Also, double-check that the post you want to share isn’t marked as “Private.” Craft engaging captions, use relevant hashtags, and create visually appealing content to encourage sharing.
Q 2- Can I Fix That Your Post Could Not Be Shared on Instagram?
You can fix the “your post could not be shared on Instagram” error. Firstly, ensure your Instagram account is set to “Public,” as private accounts restrict sharing to approved followers. Next, review your post’s privacy settings and make sure it’s not marked as “Private.”
Check for any violations of Instagram’s Community Guidelines in your post, such as prohibited content or inappropriate hashtags. Lastly, if the issue persists, then update your Instagram app, report the problem to Instagram, or wait for any temporary glitches to be resolved.
Q 3- How Can I Make My Instagram Posts Shareable?
To make your Instagram posts shareable, ensure your Instagram account is set to “Public” rather than “Private” in your privacy settings. Also, double-check that the post you want to share isn’t marked as “Private.” Craft engaging captions, use relevant hashtags, and create visually appealing content to encourage sharing.
Final Thoughts
In short, getting the “Your Post Could Not Be Shared” issue on Instagram might be annoying, but it is not impossible to resolve. These can range from issues related to image dimensions, posting frequency, and file formats to server problems, unstable network connections, outdated app versions, and violations of Instagram’s guidelines.
Users can improve their chances of successfully sharing their posts by following a series of troubleshooting steps. These steps include resizing images, moderating posting frequency, updating the app, and ensuring compliance with guidelines. Additionally, clearing the app’s cache, switching between internet connections, and reporting persistent issues to Instagram support can help resolve this error.